

How To Make A Quilt For Beginners With Pictures
If you need some new ideas for a artistic project, let me show you lot how to brand a photo quilt! You tin can simply print photos onto the fabric, which tin be and so cut up and sewn together into a quilt.
In that location are tons of ideas on how you can piece together your quilt. What you will get is a timeless photo anthology, a keepsake for the future generations of your family, something you will never be able to create with the fabric yous purchase in stores. Here's how you can do this.
Footstep 1. Cull Materials
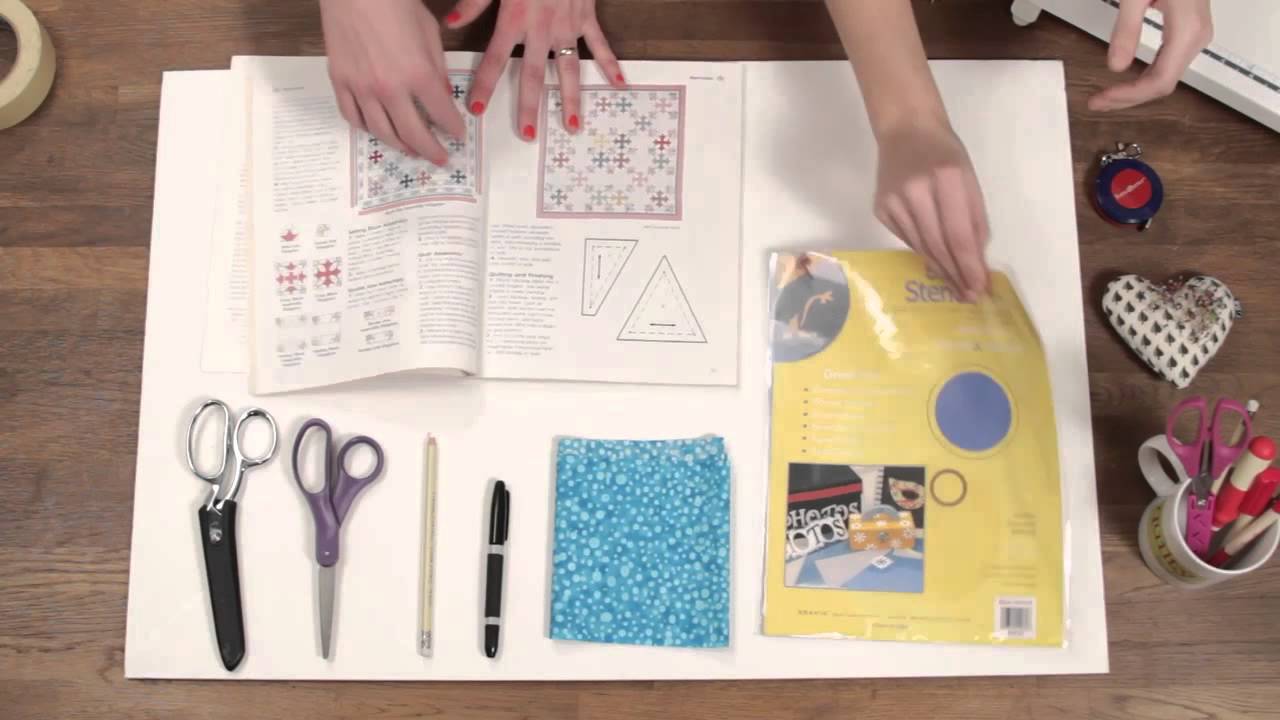
You volition need some fabric squares for your quilt. The number and the size of your squares will depend on the size of the quilt yous want to make.
- Fiskars Rotary Cutter
- Self-Healing CUTTING MATS
- Rowenta Steam Atomic number 26
- Dritz Safety Pins
- SINGER Sewing Motorcar
- xl Buffalo Lodge Charm Pack
One time you know the verbal number of the squares (or other shapes yous are planning to use), merely decrease the number of photos y'all volition be using.
For the pictures, you will need some printable fusible textile that you lot volition then transfer onto the white fabric, or some photo cloth sheets. Other materials include binding, batting, thread, and some bankroll fabric.
Stride 2. Plan the Quilt
Cull the layout and size. If you lot want to make a baby quilt, stick to the size of 36x45 inches, these are the about common dimensions, or you can make the size y'all need, there are no restrictions. Brand sure you accept a multifariousness of dissimilar fabrics for your quilt and plan the layout in advance.
Pace iii. Effigy out How Many Photos You lot'll Need
Is your quilt going to be full of photographs, like a real photo album? Or will you lot simply include a photograph here and at that place?
Step 4. Fix the Photos
If y'all are using old photographs, scan them first. Then, you will have to crop the photos to the sizes you need for your quilt. Create a certificate and start pasting your images into information technology, adapt them to take some white spaces between.
These spaces will be your seam allowances and in that location has to be at least one-half an inch between each photo. You demand to paste as many images onto a single page as y'all tin can.
Remember, yous can feed your special paper through the printer only once! Practise not worry also much about their guild or how they are arranged all the same, you volition cut them out later.
Pace 5. Edit Them


The photos on your quilt must look exactly as you want them to, in other words, they must be perfect! So, make certain you edit them before press.
This may include removing unwanted objects from the groundwork, fixing the red-eye issue, adjusting contrast and brightness, correcting color issues.
If you want to accept black and white images, and then you will need to utilise the respective filters or black and white apps. If the photograph is as well old, try restoring it.
Pace half-dozen. Print the Photos

The fabric for printing has a "right" side (meant to be printed on) and a "wrong" side. Make certain y'all feed it in your printer correctly. It's reasonable to practise a examination run to know that your printer has the correct settings and adjust them if needed (for case, y'all may need to change the paper setting for the heavier paper).
Another of import matter to consider is that your printer volition simply take the cloth with a straight and even edge. If it's not, you can trim with a rotary cutter, employ a ruler and a mat to become the best effect. Or employ special atomic number 26-on transfer paper and print straight onto it, post-obit the manufacturer'due south instructions.
- Bank check out information on how to print photography.
Step seven. Choose, Launder, and Iron the Fabric
If you utilise an iron, you need to remember that the white parts of your prototype will have no ink on them. It means that they will exist the color, pattern or texture of the fabric y'all volition be using.
Choose something that is light in color and then that your photo looks the best. To make things faster on the twenty-four hour period of sewing, ready the cloth in accelerate. This means washing information technology and ironing it earlier transferring the photos.
Step viii. Transfer the Photograph to Cloth
If you lot use the iron-on transfer, yous have to apply it to the fabric of your choice and with the help of the iron. Non to mess annihilation up, your iron shouldn't steam the newspaper.

In the case of the special cloth, you lot print direct onto the cloth as it is explained in step 3 in more detail.
Step 9. Allow the Ink Dry out
Later on transferring the image onto the fabric, let it dry for at least 30 minutes earlier using it. This will allow the ink to set.
Additionally, you can rinse the sheets of material by mitt in some mild detergent. You can besides utilize a specialized detergent for the fabric that has been recently dyed (like Chimera Jet Rinse). Information technology will ensure that the colors will not fade after the ink is dry.
Step 10. Depict a Diagram, Cutting the Pieces
Past the time you are ready to cut your quilt pieces, you should take the verbal programme. I recommend creating a detailed diagram of where exactly each element will go. After yous are satisfied with the quilt patterns, kickoff cutting your pieces. Don't forget about the seam assart, it should be at least a quarter of an inch.
Yous can brand a quilt with fabric pieces of different shapes. If the pieces have straight lines (squares, diamonds, triangles, etc.) it is better to cut them with the help of a rotary cutter, a mat, and a clear cutting guide.
If using circular shapes, you can create a template to trace effectually and cutting with scissors. These round shapes can be and then fastened as appliques to the squares.
- Cheque out tutorial on how to transfer a picture to canvas.
Pace xi. Use Wall Felt to Become the Big Flick

By using a piece of felt slightly larger than your finished quilt, you volition exist able to adhere your pieces to information technology (cotton wool will stick to it, alternatively, you can as well use pins) and see what the concluding project is going to look like. Information technology's a slap-up visual trick.
At this stage, before you've attached whatsoever of the pieces together, you can move the elements effectually and alter the location of squares that don't get together.
Footstep 12. Stack Squares to Sew Rows
Now the actual sewing fourth dimension! First, you demand to become all your squares adhered to the felt on the wall into stacks for each row of your quilt.
Start on the bottom left and work your way upwards, placing the lowest square on the second i from the bottom, then the two of them on the third, and and so on until you have the first row neatly collected in a single stack.
Apply a pin at the acme of the square, this will go on them together and also remind you that this is the upper side of the squares. Continue doing the aforementioned for the rows that are left.
Lay your stacks out in the guild they are going to announced in your quilt. Begin by sewing the top of the bottom foursquare to the bottom of the side by side foursquare in your row, without cutting the thread, practice the aforementioned for the second row, and then on.
In the end, you will get a long strip of the start ii horizontal rows of your quilt. Cutting the thread and practice the same for squares 3 and 4.
Continue until you've sewn up all your squares into horizontal strips. With your iron, press the seams apartment. Now just sew the vertical rows together, and, voila, you lot are almost half-way there!
Step thirteen. Add Batting and Backing
Prepare the batting and backing of your quilt past cut the fabric a chip larger than the dimensions of your quilt. You will demand to attach these temporarily together and basting is the all-time technique.
To do this, get-go at the middle and work exterior towards the sides. Each basting row must be four inches apart from some other. The basting should go vertically and horizontally.
- Learn how to how to make a photo volume.
Step 14. Machine Quilt

Doing the machine quilting is faster than creating it past hand. If you are non confident enough, mark the lines on your quilt with a disappearing ink beforehand. Work with a #2 run up, information technology's not going to unravel and is very piece of cake to ready in example you make any mistakes.
If you are making a large quilt, roll it up and continue open only the area y'all are currently working on. Use clips to keep the rolled-up edges in place.
Step fifteen. Bind and Terminate

Cutting your binding. These should be two-inch wide strips that you will later on join together into a single long strip with the help of diagonal seams. Make certain you measure the sides of your quilt and cut enough binding for them.
Cutting one of the ends of your binding diagonally and fold the quarter of an inch seam allowance, printing with your fe. Fold the whole strip in half and fe the crease. Start attaching the binding to the edges of your quilt.
Marshal the raw edges of the quilt and the binding, use pins to hold it all together. Sew at a quarter of an inch away from the edge. Make mitered corners.
On the back of the DIY photo quilt, you will need to work past hand to make it expect neat. You should utilise the blind stitch for that. If you are planning to hang your quilt on the wall, you lot will take to sew an additional fabric tube.
Attach it to the elevation of the quilt, on the back under the bounden. Brand it narrower than your quilt; the dowel y'all volition insert into the tube should be out considering you lot volition hang it on the nails.
This is a rather brief tutorial on how to make a quilt with pictures. At present, you can create something that volition bring back some lovely memories from the past or a fun project with photos y'all beloved. The sky is the limit!
20 DIY Photograph Quilt Ideas
Having learned how to make a photo quilt, you can use the skill for something stunning. Later on all, it's a not bad way to continue the memories of your happy days or make a memorable gift for your friends and family.
1. Quilt for Rex Size Bed
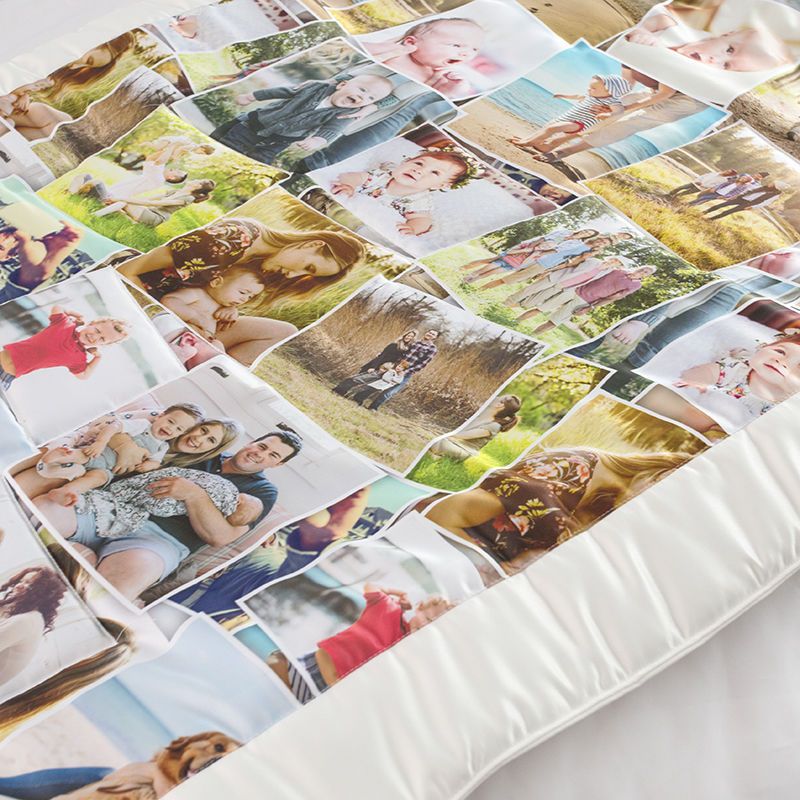
Brand a quilt with pictures for a king-size bed. This is definitely not a quick project just considering of the size but that is its advantage besides. Just imagine how many astonishing photos you tin fit onto a quilt like this!
2. Film

Choosing random pictures for the quilt is ane way to get but how near choosing a specific theme? For example, your wedding. You don't have to know how to make a quilt with photographs. Make it wait like a flick strip that yous sew onto your quilt!
3. Zigzag

Placing your photos in a zigzag pattern on the quilt will look dynamic and volition assist to tell the cohesive story (the eye of the person looking at information technology will naturally motion from the top down, post-obit each image along the manner).
iv. Pink

Would you like an thought of how to make a motion picture quilt for a fan of a pinkish color? Just use all its different shades in one coating to frame the favorite photos. A pro tip - the images of the same size should be used together for a more than harmonious wait.
5. Patchwork

This technique means using big spaces of textile squares betwixt your photographs. Brand sure you cull your patterns and colors and so that they don't clash with the photos.
6. Structured Patterns

A pattern that is symmetrical and has a defined construction will look classy and professional. Just brand sure your photos are perfect.
7. Chronological

Choose the moments of your life that y'all cherish the about and identify them in the guild they happened. This volition be a very special quilt for you.
viii. Handprints

Want the most heartwarming idea ever? Create a photo quilt for the grandparents with the photos of the grandchildren and also introduce squares with their little handprints here and there.
ix. Make Borders

Create an elegant photograph frame look by making a wide border on your quilt. Additionally, you can add a thinner black sub border. It will brand a overnice groundwork for the photos to stand up out against.
10. Collage

Forget near additional textile squares on your quilt and simply make one big collage of your photographs. Cull large images that tell one story.
11. Mix Fabrics

Make a rag quilt with squares made from a variety of dissimilar fabrics and simply throw in a couple of photos. It will await unexpected.
12. Blue

How to make photo quilts and non to have photos disappear amidst all the patches? Choose solid blueish as your groundwork color, it will guarantee that your photos will exist highlighted.
13. Few Photos

Y'all tin go the opposite way of using many photos and only include a few best ones. To make your quilt look even prettier include some squares with embroideries or fun appliques.
14. Honey

Y'all tin can make a quilt as a gift to any of your family members. Make it with love and they volition feel how appreciated they are.
15. Spectacular

Are you looking for a spectacular combination of colors to utilize on your quilt? Become for light purple and blackness. Information technology volition look regal.

Tata Rossi
Hi there, I'm Tata Rossi - a professional blogger, read more than

How To Make A Quilt For Beginners With Pictures,
Source: https://fixthephoto.com/how-to-make-a-photo-quilt.html
Posted by: blackalver1982.blogspot.com
0 Response to "How To Make A Quilt For Beginners With Pictures"
Post a Comment